You are currently browsing the monthly archive for November 2012.
My quest for replicating common chocolates continues- I love my ‘Bounty’s’ now on to ‘Twix’ (would love to do Kit Kat but I think that gonna be impossible)
My journey began with foods I have never heard of till now. I have a dehydrator at home inherited from my folks who bought it to dry fruit and never used it! So I am looking into incorporating raw foods into our day to day diet to try and completely erradicate industry processed foods. A tough thing to do it seems!
Anyway- Buckwheaties are first on the agenda- apparently you can buy these ready made- but where’s the fun in that?! Also nowaday buying something made isnt as simple as making something and putting it in a bag to give to someone else.
Buckwheaties: (these can also be used as snacks in themselves as I discovered when my 3 year old kept coming back for more! and also are used as cereal or added to muesli. They are really crispy and are seeds derived from a flour so are completely grain free. Ground they are also a great flour and are used in alot of baking recipes- they are really quite moreish! You may have come across Buckwheat in Japanese buckwheat noodles, Russian pancakes (Bilini’s) and are used in beer production too!)

1 cup of Buckwheat Groats (very easy to buy I got some in Green dot)
Water
Pyrex bowl
Tea towel
This takes a little time, but is worth it. Rinse the groats in some water and leave to soak (preferably in filtered water) overnight. In the morning drain them and set in a glass bowl and cover with a tea towel. In the evening- rinse the groats and again place in the bowl and cover with the tea towel. In the morning they should have sprouted. Now they are ready to dry. I put them in the dehydrator, but you can use the lowest setting on your oven. Spread out the groats and dry until crunchy- takes about 6 hours in the dehydrator at living foods temperature.
Right now to the twix- this then takes no time at all!
1 cup of Buckwheaties
1/4 cup of dates (preferably organic medjool)
1/4 cup coconut sugar
3 tbs Cocoa Butter (melted)
Put the buckwheaties, dates and sugar in a food processor. I had to use a mini chopper as my Kenwood mixer food processor didnt have a good enough seal for the crumbs to stay in. Blitz until crumbs but may be some big bits still- keeps it crunchy and biscuit like. Add the cocoa butter and mix till its evenly mixed through.
Boil kettle and soak for 15 mins 1 cup of medjool dates for the caramel
Put some cling film in a baking dish- I used a square silicon one. Press down so bottom is evenly covered by the base. Put in the freezer.
While this is freezing make the caramel.
1 cup of medjool dates soaked (as above)
1/4 cup coconut nectar/maple syrup
2 tbs nut butter- I uses smooth organic peanut butter
3 tbs cocoa butter (melted)
1/4 tsp vanilla essence
Blend these all together and take out the biscuit base and smooth over the top. Put back in the freezer for a few hours.
When it’s set and frozen. Melt 200g of quality organic/ fair trade min 70% dark chocolate. I used endangered species (I think 1 milk chocolate bar and 1 dark will make it taste less overwhelmingly chocolate and more authentic to the Twix bar). In a Bain Marie. Take out base and caramel from freezer and lift out of bakeware onto a chopping board. I cut it into 1 inch squares. Get some baking parchment to put them on. Roll around using 2 forks in the chocolate till covered and lift out and put on the baking parchment. When finished put in the fridge for a couple of hours to set- or the freezer.
And Voilà- try don’t taste exactly the same- they taste better!
Don’t forget to put the excess chocolate in a parchment to make caramel biscuit chocolate bar after!!!!
Reward your self with one or two with a cup of Chai roobios!!
Thanks to these two ladies- without which this would never come into existence for me!
http://www.terawarner.com/blog/2012/10/raw-vegan-recipes-raw-vegan-caramel-fingers-aka-twixy-biscuits/#more-27946
http://www.haverawcakeandeatit.co.uk/raw_food_uk/BUCKWHEATIES_recipe.html
My husband is Irish, they love their bread. He has embraced being Gluten free for the most part and really enjoys making bread so this is his take- he wants to play and tweak it a little but here is the starting point!
he’s as bad as me at following recipes but this is what I got out of him!
1 cup all purpose gluten free flour,
1/2 cup Quinoa flour (although he wants to play with that as he doesn’t like the after taste of it!)
1/2 cup almond flour (our almond flour is now the leftover almond from the milk, dried and ground further in the coffee grinder)
30g steel cut oats (or normal oats if you are not celiac) optional,
1/2 teaspoon salt,
1tbs honey (can use coconut nectar)
1tsp bicarbonate soda,
1 cup yoghurt.
Preheat oven to 200. Sieve dry ingredients into a bowl add wet ingredients. Try to mix as little as possible, p,ace on grease proof paper on baking sheet, dust lightly with more all purpose flour and cut a deep cross in the top. Bake for 30 mins until brown on the outside!
For Gluten free its a nice consistancy and goes lovely spread thick with some butter!
Onions are amazing at drawing out bacteria and microbes. They also have anti-inflammatory and congestion-relieving properties. Also onions are recognised as being able to relieve symptoms of the flu such as coughs, congestion, respiratory infections and bronchitis, as they contain anti-viral elements.
They are also high in sulfuric compounds such as thiosulfinates, Research shows that the thiosulfinates in onions are responsible for their antimicrobial properties and have even been shown to kill off salmonella and E. coli. Sulfuric compounds also play a role in cancer and heart disease prevention, and therefore act as a great immune-boosting food for general disease prevention.
Onions are also extremely high in the anti-oxidant Quercetin which helps the body fight free-radicals, and boosts the immune system
Honey is soothing but also sticks to the bad guys and gives the body some help mopping up and excreting waste products. Honey contains antibiotic enzymes- Manuka is the highest in them which is why Manuka is touted to be the best. The different numbers are the different grades of honey 16+ and above are the most potent apparently.
Here’s my multi purpose age old natural way if alleviating sore throats, dry coughs, tonsillitis, chesty coughs and any general immune boosting needs. It’s also great for funny tummies and diarrhea.
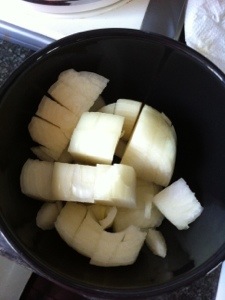
Cut up a whole onion and place in a bowl (you can also use thyme/rosemary which are great expectorants)
Pour honey over to cover (use raw, Manuka honey, plain honey will also work if its all you have to hand)
Leave for 1-2 hours.
Drain liquid- I use a funnel into a glass jar
Put in the fridge and dose a tsp at a time. Will keep in the fridge for about a month.
Another way of using honey is to cut an onion in half and keep it by your bedside (raw onion would absorb germs in the air, preventing them from entering the body.-t hey must be removed as soon as they lose their odour and become discoloured, and be replaced by fresh ones).
My hubby came up with this recipe. These are based on Jamie Oliver’s American pancake recipe, changing the ingredients but keeping e method. Whipping the whites gives these pancakes an amazing lightness. If you need it to be egg free you may lose this lightness. You can substitute the eggs with ground flax- 1 egg= 1 tbs flax to 3 tbs water mixed together then added (so this recipe will need 3tbs flax mixed in 9tbs water) try whipping the mixture to see if it makes a difference.
70g almond flour
25g coconut flour
20g Quinoa flour
3 large eggs
1 heaped teaspoon baking powder
140ml Kefir (but you can also use almond milk or oat milk
a pinch of salt
First separate the eggs, putting the whites into one bowl and the yolks into another. Add the flour, baking powder and milk to the yolks and mix to a smooth thick batter. Whisk the whites with the salt until they form stiff peaks. Fold into the batter – it is now ready to use.
Heat a good non-stick pan on a medium heat. Pour some of your batter into the pan and fry for a couple of minutes until it starts to look golden and firm. At this point sprinkle your chosen flavouring (see below) on to the uncooked side before loosening with a spatula and flipping the pancake over. Continue frying until both sides are golden. The batter will keep in the fridge so why not make half and save the other half for the next morning!
We serve these with a choice of nut butter and banana or berries and coconut nectar. But you can have them with anything. You can also add banana, blueberries or raspberries to the batter while they are cooking too if you like and then drizzle them with coconut nectar/maple syrup. Delicious…
I used to make Raw Almond Milk for my daughter for when she weaned off Breast milk at 15 months. I was really confused, we are a dairy free family and I wanted to be able to give her something with loads of nutrition. Almonds are packed with goodness- calcium, magnesium and Vitamin E to name a few and of course are an excellent source of protein. I was making almond butter with the leftover almond meal but ended up throwing most of it away. After meeting some amazing women I have realised there is loads you can do with the leftovers so have been inspired to make it again. You can dry the meal and grind it in a coffee grinder to make almond flour, something I have been buying anyway to bake with. It can also be frozen, used in bone broth, added to Chia Porridge and muesli.
I have a normal blender- if you have a more powerful mixer you may want to play with the ratio.
I use a ratio of 3:1 water to almonds.
You have to soak the almonds first overnight or at least 8 hours. I use Raw almonds to get the most nutrition and I soak them in distilled water.
When the Almonds are ready, put them in a blender with the water
1 cup almonds: 3 cup of filtered water
a pinch of salt (I have been using Pink Himalayan rock salt but also like sea salt
vanilla essence (I use a couple of drops of the Medicine Flowers one but you could add a capful of regular essence)
Some times 1-2 Medjool Dates (or other dates soaked)
I blend then pulse and blend to make sure I get as much out of the almonds as possible. I then strain through a nut/soup bag. I have also used a sieve as I don’t mind fine bits of almond in my milk. to get a smoother consistency you can use the nut bag or a muslin cloth. I then let it sit and strain for 10 mins, gently move with a spoon and then dry the almonds in the dehydrator or the lowest setting in the oven (or just fan if you can). The almond milk goes in the fridge ready to make Chia porridge, Almond Milk Kefir or Iced coffee
 This takes quite a bit of prep, but when its made its awesome! I have been making Mocha concentrate. You can keep it in the fridge so you just pour it out straight into the glass 50/50 with milk. Add ice and go. I am not the biggest coffee fan, but ever since I got pregnant with my son I crave it. Less now he’s born but I still fancy it now and then. It makes me feel really weird so I can only have decaffeinated This is a good link to describe different ways of making coffee decaffeinated- http://goaskalice.columbia.edu/decaffeinated-coffee-safe-drink I use the ‘naturally decaffeinated’ coffee for mine and raw cacao powder for the chocolate. I also added some coconut sugar and vanilla essence just to take the edge off (can you tell I don’t really like coffee!!). It can be made straight with coffee to your own taste
100g coffee
to a litre water ( to adjust to make more/less)
50g Cacao powder
2 tbs Coconut sugar (optional)
1/4 tsp Vanilla Essence (optional I also like Hazelnut Essence)
Put coffee, sugar and cacao in a large glass bowl. Pour over water and stir. Leave to sit for at least 8 hours, stirring from time to time. Pour into sieve through a muslin cloth (at the very least a coffee filter or paper towel) Allow to sit through strainer for another 15-20 mins. Use a spoon to press last water through. Add vanilla essence. Put into a container to refrigerate.
When you want to use it use milk (Coconut,Oat or almond are delicious) 50/50 mix in the glass, add ice and enjoy with some beetroot brownies…
I love these brownies, a great friend of mine recently also posted another vegan brownie recipe which I have included below…
Seriously rich and delicious brownies with way more goodness than the normal ones!
400g Raw Beetroot peeled and roughly chopped (use plastic gloves if you don’t want to stain your fingers) then add to saucepan and boil/steam till tender.
100g Hazelnuts
150g Plain Chocolate,
100g coconut oil/mana
1 tsp Vanilla extract,
100-150g Coconut sugar
3 Eggs (To replace one egg: 1 tablespoon ground flaxseeds 3 tablespoons water (or other liquid) Stir together until thick and gelatinous)
2 Tbs almond flour (can also use quinoa, rice or chickpea)
70g Cocoa ,
2 tsp baking powder.
Heat oven to 180C and grease a tray bake pan. Roughly chop chocolate, and put in food processor with cooked beetroot, coconut oil and vanilla. Whizz until mixture is smooth. In another bowl, beat sugar, eggs and salt until foamy and thick. Fold in beetroot mixture. Sift in flour and cocoa and gently fold. Stir through hazelnuts. Poor into tray bake and cook for 20mins. Cool completely in tin then cut into squares. This can easily be a cake, just don’t cut into squares!
My fave raw frosting from The Rawtarian…
1 cup dates
1/4 cup raw cacao (cocoa) powder
1/4 cup cold-pressed coconut oil (also known as coconut butter)
3/4 cup water (or a tiny bit more if needed – try to keep at 3/4 cup or so though)
Place all ingredients in a high-speed blender. If possible, let them sit in there for a few minutes to soften the dates a little bit. Blend all ingredients in your high-speed blender. The ingredients can be a little finicky to blend, so start at a slow speed and increase speed slowly. Keep blending for a very long time to get a velvety consistency. This is one of those recipes that really makes use of the power of a high-speed blender. If you feel that the blades are just spinning but aren’t actually moving all of the icing around, turn the blender off and make an air pocket down the side of the blender with a spatula to expose the blades. Remove the spatula, replace the lid, and start blending slowly again.You’ll know it’s ready if there are no bits of dates and all you can taste is velvety chocolate goodness.
(http://www.therawtarian.com/raw-chocolate-icing)
Siobhan’s Black bean Brownies:
Awesome vegan brownies
1/2 cup of blended black beans (black beans and water blended to a gluggy consistency)
1tbsp oil
1 c sugar (I usually only do half though as the banana adds sweetness)
1/2 large banana, mashed
1tbsp chia seeds, hydrated
1/2c flour (I use mostly oat with a bit of coconut and quinoa)
1/3c cocoa powder
1/4tsp baking powder
1/4tsp xantham gum
1/4tsp saltPreheat oven to 175C. Grease pan.
In a medium bowl mix bean mixture, sugar, vanilla, mashed banana and chia seeds. In another bowl combine dry ingredients. Gradually stir dry ingredients into wet, until well blended.
Bake for 20-25mins or until brownie starts to pull away from edges of pan.
Let cool then cut into squares.
Chia Porridge w/Seeds, Nuts & Berries
I have a 10k race tomorrow, my first since having my second baby 18 weeks ago. I am nervous as so far I have maxed out at 7k. My goal was and still is to finish, I never thought I would be running the whole thing. However I am very competitive and so secretly see myself sprinting to the end! So am going to give myself the best chance. This is my (very early) breakfast tomorrow. Great protein, fat and carbs- my kind of ‘carb loading!’
3 tbsp chia seeds
1 cup organic unsweetened almond milk/oat milk
1/2-1 tsp cinnamon
1/4 tsp all spice
1/2 tsp vanilla
diced strawberries, raspberries & blueberries for toppings
raw almonds, cashews & sunflower seeds for toppings (preferably soaked over night)
Method
Place almond milk in a bowl and sprinkle chia seeds in and stir immediately for a minute or so to avoid clumping. Add spices as you stir along with the vanilla. Allow to stand for 30-40 mins to thicken, or covered in the fridge over night. Add berries, nuts and seeds on top to eat.
For my son (almost 8 months old) I use 1 tsp chia and mix with 2 tsp water and let soak either overnight in the fridge or for 15mins while he eats some blueberries/mango/melon or banana!


